
Having a Solaris 11.4 system in my lab has proven to be very helpful when I need some quick iSCSI storage as a temporary holding place when I need to rearrange storage in other parts of the lab. This post covers the quick and dirty how-to for using iSCSi storage with Solaris, both providing iSCSCI targets to other systems and mounting iSCSI targets on Solaris. This article uses anonymous/insecure iSCSI connections, so don’t follow these instructions in a production environment or where you are concerned with someone trashing one of your LUNs.
Setup
Install Needed Package
In order for Solaris to provide iSCSI targets you’ll need just one additional package beyond a typical base install: iscsi-target
root@sol114:~# pkg install iscsi-target
           Packages to install:  2
            Services to change:  1
       Create boot environment: No
Create backup boot environment: No

DOWNLOAD                                PKGS         FILES    XFER (MB)   SPEED
Completed                                2/2       159/159      1.8/1.8  1.9M/s

PHASE                                          ITEMS
Installing new actions                       255/255
Updating package state database                 Done
Updating package cache                           0/0
Updating image state                            Done
Creating fast lookup database                   Done
Updating package cache                           1/1
Enable the iSCSI Management Service
Next you’ll need to enable the iscsi target management service:
svcadm enable -r svc:/network/iscsi/target:defaultCreate ZFS Storage to Use
We’ll go ahead and create a zpool and a zfs dataset for our iSSCI logical unit. If your root zpool (usually rpool) has space, you can also use it just fine. For my demonstration, I have a second volume that I’ll create a zpool on:
zpool create tank c2t1d0This gives us a zpool on the disk c2t1d0, now we can create a dataset to use:
zfs create -V 55g tank/istoreConfigure iSCSI Target
Initiators will need a target to use when reaching our host so let’s create one:
itadm create-targetNext we need to create the LU – the logical unit that represents the iSCSI storage backing. Note that your backing will the zvol/rdsk path to your zfs dataset (always of the form /dev/zvol/rdsk/(zpoolname)/(zfsname)):
root@sol114:/var# stmfadm create-lu /dev/zvol/rdsk/tank/istore
Logical unit created: 600144F027E7880000005F5B7BAD0001
Create a View
A view basically provides a name for the logical unit. The view can be used to control access, present LUNs, etc. For our simple lab-setup, its as easy as:
root@sol114:/var# stmfadm add-view 600144F027E7880000005F5B7BAD0001This gives us a simple, insecure way to provide an iSCSI LUN. Outside of a lab environment, this really isn’t enough because you don’t want to rely upon hosts not accessing the LUN if they shouldn’t. We’ll look at some simple security options in a future post.
Recap
That’s it for the Solaris iSCSI target side. Here’s a recap of each command we ran on Solaris:
pkg install iscsi-target
svcadm enable -r svc:/network/iscsi/target:default
zpool create tank c2t1d0
zfs create -V 55g tank/istore
itadm create-target
stmfadm create-lu /dev/zvol/rdsk/tank/istore
stmfadm add-view 600144F027E7880000005F5B7BAD0001 #from create-lu output
Map the LUN on a Host
We can now map this volume on any host with an iSCSI initiator. For example, ESXi 7.0.
vCenter ESXI 7 Example
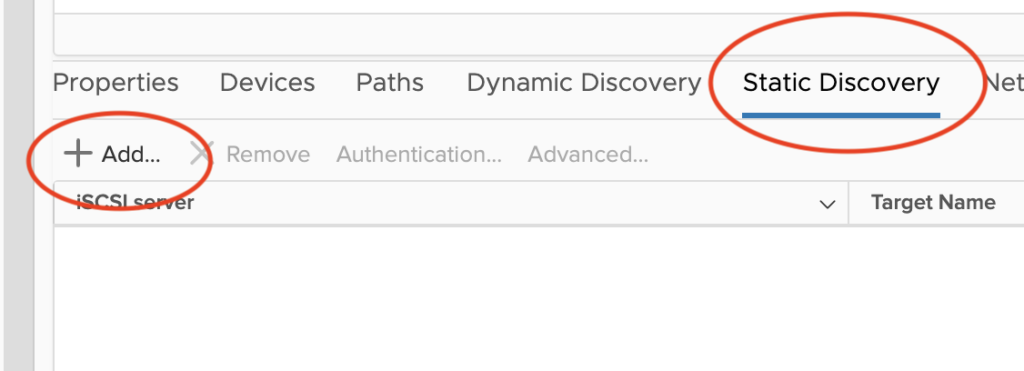
We need to configure the iSCSI software adapter in vCenter. You don’t see the iSCSI adapter, click Add Software Adapter to add it.

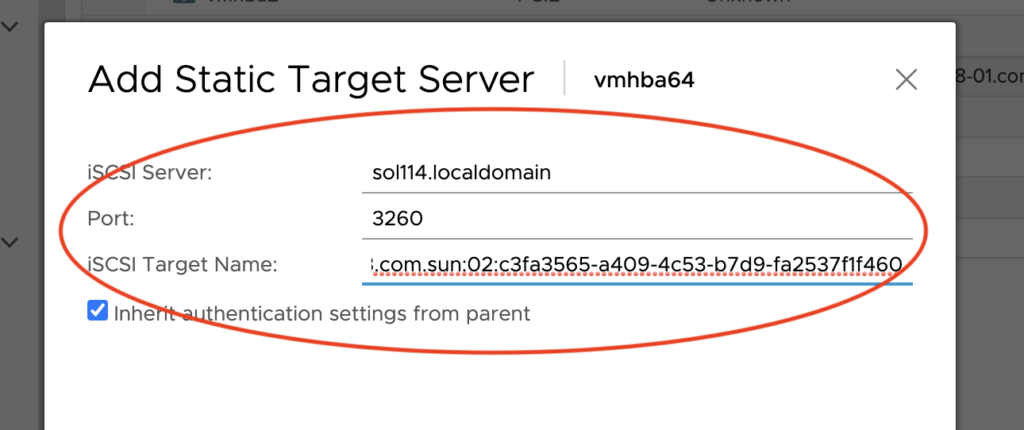
Next configure a static discovery address using the IP address and target from our Solaris server. Again, this LUN is presented to all iSCSI initiators on the network so it’s simple here but not appropriate outside of the lab – and not appropriate in a large lab likely either.
Next, you’ll be prompted to rescan storage, which you should do. If you don’t see the device after a rescan and refresh, make sure your iSCSI adapter has network access in vCenter.
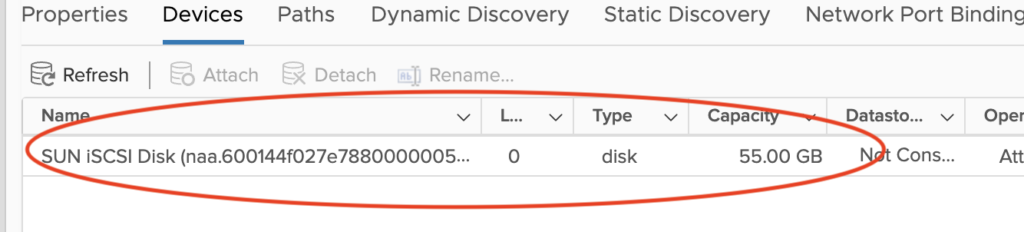
Now you can create a VMFS datastore using the iSCSI storage. The LUN can be presented to multiple vSphere servers creating shared storage.
Solaris 11.4 Client Example
The following shows how to configure another Solaris client to access the iSCSI storage we created above. This creates a simple static config pointing to the initiator on our previously configured Solaris host:
iscsiadm modify discovery -s enable
iscsiadm add static-config iqn.1986-03.com.sun:02:c3fa3565-a409-4c53-b7d9-fa2537f1f460,192.168.1.186
devfsadm -i iscsi
We can now see the volume in the output of format and can use it as normal storage:
root@vm010:~# format
Searching for disks...done


AVAILABLE DISK SELECTIONS:
       0. c0t600144F027E7880000005F5B7BAD0001d0 <SUN-COMSTAR-1.0-55.00GB>
          /scsi_vhci/disk@g600144f027e7880000005f5b7bad0001
       1. c2t0d0 <VMware-Virtual disk-2.0-40.00GB>
          /pci@0,0/pci15ad,1976@10/sd@0,0
I’ve found this quite useful when I need to completely reconfigure my lab VMWARE cluster storage without losing my VMs. I’ll quickly setup a Solaris host on my desktop VMware Fusion, present the storage to my vSphere hosts, and then I can easily move things around.